At the end of 2022 vMX was announced to be End-of-Life. This was met with dissapointment from my end as it was/is one of the better virtual offerings to emulate a router and be relatively assured that bugs would be at a minimum due to it’s commercial support.
Just recently a new offering from Juniper appeared called vJunOS switch which is more in the vein of vEOS-lab in that it’s free but also requires no login to download (vEOS-lab requires a login to download).
vJunOS Switch is a great addition to my virtual home virtual lab and I’ll demonstrate how to stand it up (doing it my own way and not using the documentation of course!)
The nitpicks however I have (which I hope will get better) are two things:
1.) The hardware requirements are high. 5Gb of RAM and 4vCPU. Compare to Arista vEOS which i’ve gotten to run with 1vCPU and 2GB of ram. For comparision sake, with a $300 ebay NUC w/ 8 cores I can run 8 vEOS’s and with vJunOS (or vMX) I can only squeeze out two.
Also the vFPC/PFE appears to be taking up 100% of CPU of the cores it’s been allocated which unnecessary sucks up power for a lab device.
And then there’s the fact that the only officially supported CPU is Intel which is far and large more expensive $ to Core ratio than AMD.
The desirable state from a lab point of view would be minimal cost which should take all of these into account. But given this is Juniper’s first release of the product I remain hopeful that they’ll perhaps write a forwarding-plane that isn’t an emulation of any given hardware platform which would make performance and core count dramatically better.
2.) A nested vFPC VM is present. This makes it challenging for me to try to deploy this in a more ‘cloud like’ manner to any of the cloud providers. A rough hourly cost is 10 cents an hours for 4 cores with 8GB of RAM. With a written framework to stand up a lab in with automation I could have a dozen of these stood up for $1.20 an hour and at most I’m using a lab on demand for less than a cup of coffee.
Solving either of these would benefit Juniper as when the cost goes down to even _run_ your product it widens the aperture of the audience that can use your products.
The things they did right for vJunOS Switch:
1.) Free download and no login required.
2.) Documentation is better than the competitors.
3.) It supports up to 96 interfaces which is more than the 8 or so you could get from each vFPC on vMX. A huge annoyance on vMX as the vFPC’s were the vCPU and RAM hogs and of course ran the vCPU’s at 100%.
Standing up a vJunOS <-> vEOS lab (and also some containers)
Reference Git-Hub link with KVM configs
The first feature I wanted to test to when downloading vJunOS was to test if it could do MPLS. Because the name switch and the fact that Juniper doesn’t support MPLS on it’s EX product line I wanted to see if there were any baked in artificial limits. I also wanted to test vJunOS by connecting it to an OVS-switch as the official juniper documentation has it using linux bridges.
Since I’ve never done a proper A to Z lab setup on this blog I’ll take this as an opportunity to also do that and show how it can all be automated in another blog post.
Let’s dive in and see what’s possible.
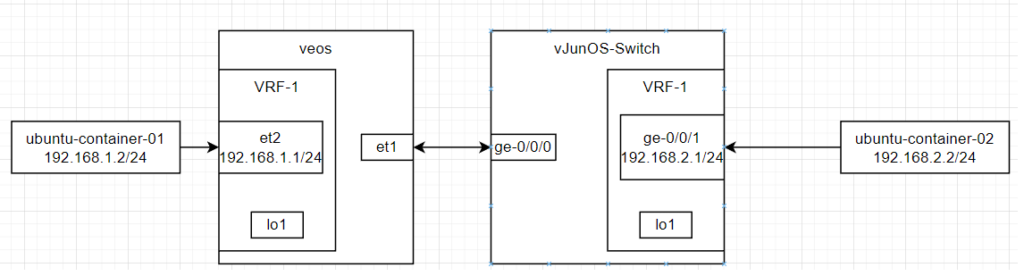
Step 1) Come up with a plan of the topology
The initial planning stage is very important to me and I always start with a diagram of what it is I want to accomplish so I can refer to it during the setup stages and also alter it if I discover things need to change:
Step 2) Copy the images over
vMX/vJunOS typically docs typically refer to doing some kind of install script. I skip all that and just grab the qcow2 image and begin turning on the VM. The install script will do things like create virtual interfaces for you but given my goal is to interoperate with another vendor’s virtualized platform I would rather be in complete control of that process
netadmin@intelnuc:/usr/local/kvm/vjunos-switch$ ls -la images/
total 9370260
drwxrwxr-x 2 netadmin netadmin       4096 May  2 20:55 .
drwxrwxr-x 4 netadmin netadmin       4096 May  2 21:06 ..
-rw-r--r-- 1 netadmin netadmin 1092878336 May  2 23:15 veos.qcow2
-rw-r--r-- 1 netadmin netadmin 4541579264 May  2 23:17 vjunos.qcow2
-rw-rw-r-- 1 netadmin netadmin 3960668160 May  2 20:52 vjunos-switch-23.1R1.8.qcow2
netadmin@intelnuc:/usr/local/kvm/vjunos-switch$
Step 3) Determine variable names of everything
I won’t go too deep into any kind of thought process here but you can see that I prefer to give everything a meaningful name which is helpful to my human eyes when troubleshooting problems. If I can prepend the hostname of the device in the bridge or interface name and also include interface numbers then I will. In some cases I’m limited by character limits in KVM (16 char limit).
For interfaces I like to follow this format: [HOSTNAME]-[PORT]
For bridges connecting to known other devices I like to use this: [HOSTNAME-A]-[HOSTNAME-B]
If I’m just creating an ‘open port’ bridge such as a container of any variable name may connect to it or I know I need the open port but uncertain of what will connect to it in the future then I like to use this format: [HOSTNAME]-b-[PORT]
Step 4) Create the OVS bridges and tuntap interfaces prior to defining/starting the KVM.
This must be done prior to starting the KVM as at startup is when the KVM will attempt to attach the bridge. Some special config must be done (the other-config bits) so that lldp/lacp will work.
brctl addbr rmgmt

echo 'iface rmgmt inet static address 192.168.0.1 netmask 255.255.255.0' >> /etc/network/interfaces

ip link add name rmgmt type bridge
ip addr add 192.168.0.1/24 dev rmgmt
ip link set rmgmt up


ip tuntap add veos-eth1 mode tap
ip tuntap add veos-eth2 mode tap

ip tuntap add vjunos-ge0 mode tap
ip tuntap add vjunos-ge1 mode tap

ovs-vsctl add-br vjunos-veos
ovs-vsctl add-br vjunos-b-ge1
ovs-vsctl add-br veos-b-et2
ovs-vsctl set bridge veos-b-et2 other-config:forward-bpdu=true
ovs-vsctl set bridge vjunos-b-ge1 other-config:forward-bpdu=true
ovs-vsctl set bridge vjunos-veos other-config:forward-bpdu=true
After doing the above I can check my work by looking at the output of these commands:
netadmin@intelnuc:/usr/local/kvm/vjunos-switch$ ip addr

6: vjunos-veos: <BROADCAST,MULTICAST> mtu 1500 qdisc noop state DOWN group default qlen 1000
    link/ether 26:61:a2:38:9c:49 brd ff:ff:ff:ff:ff:ff
21: veos-eth1: <NO-CARRIER,BROADCAST,MULTICAST,UP> mtu 1500 qdisc fq_codel state DOWN group default qlen 1000
    link/ether fe:54:00:6d:32:38 brd ff:ff:ff:ff:ff:ff
22: veos-eth2: <NO-CARRIER,BROADCAST,MULTICAST,UP> mtu 1500 qdisc fq_codel state DOWN group default qlen 1000
    link/ether fe:54:00:b1:6e:66 brd ff:ff:ff:ff:ff:ff
23: vjunos-ge0: <NO-CARRIER,BROADCAST,MULTICAST,UP> mtu 1500 qdisc fq_codel state DOWN group default qlen 1000
    link/ether fe:54:00:cd:25:ff brd ff:ff:ff:ff:ff:ff
24: vjunos-ge1: <NO-CARRIER,BROADCAST,MULTICAST,UP> mtu 1500 qdisc fq_codel state DOWN group default qlen 1000
    link/ether fe:54:00:07:29:c9 brd ff:ff:ff:ff:ff:ff
25: rmgmt: <NO-CARRIER,BROADCAST,MULTICAST,UP> mtu 1500 qdisc noqueue state DOWN group default qlen 1000
    link/ether f6:e7:77:00:9c:c8 brd ff:ff:ff:ff:ff:ff
    inet 192.168.0.1/24 scope global rmgmt
36: vjunos-b-ge1: <BROADCAST,MULTICAST> mtu 1500 qdisc noop state DOWN group default qlen 1000
    link/ether ae:3e:a8:b4:c7:46 brd ff:ff:ff:ff:ff:ff
37: veos-b-et2: <BROADCAST,MULTICAST> mtu 1500 qdisc noop state DOWN group default qlen 1000
    link/ether 66:07:7e:35:52:4b brd ff:ff:ff:ff:ff:ff

netadmin@intelnuc:/usr/local/kvm/vjunos-switch$ brctl show
bridge name     bridge id               STP enabled     interfaces
rmgmt             8000.f6e777009cc8       no

netadmin@intelnuc:/usr/local/kvm/vjunos-switch$ ovs-vsctl show

7bfddb50-5269-4ad0-9b46-48f0c289b48b
    Bridge veos-b-et2
        Port veos-b-et2
            Interface veos-b-et2
                type: internal
    Bridge vjunos-veos
        Port vjunos-veos
            Interface vjunos-veos
                type: internal
    Bridge vjunos-b-ge1
        Port vjunos-b-ge1
            Interface vjunos-b-ge1
                type: internal
    ovs_version: "2.17.3"
Step 5) Start the KVM
There could be a whole section dedicated to how to structure a KVM XML file. But I’ll just link to my git-hub where they are stored so anyone can use them as an example.
virsh define veos.xml
virsh define vjunos.xml
One thing I like to do is to follow the vendors instructions and start the KVM by itself. I then dump the XML file of that known working copy and modify the XML for my own needs. I also end up trimming back what may be unnecessary cruft added in by KVM or vendor script. But for vJunOS-switch i’ve done minimally cutting back so there may be lines in there that are unnecessary.
virsh start veos
virsh start vjunos
Immediately I can see the VM’s have started but know by connecting to the console they take a few minutes to boot:
root@intelnuc:/usr/local/kvm/vjunos-switch# virsh list
 Id   Name     State
------------------------
 6    veos     running
 7    vjunos   running
After starting the VM’s and attaching to their console
root@intelnuc:~# virsh console veos
Connected to domain 'veos'
Escape character is ^] (Ctrl + ])


veos-lab login: admin
Last login: Thu May  4 17:49:43 on ttyS0
veos-lab>en
veos-lab#
root@intelnuc:~# virsh console vjunos
Connected to domain 'vjunos'
Escape character is ^] (Ctrl + ])
FreeBSD/amd64 (Amnesiac) (ttyu0)
login: root
Password:
Last login: Tue May 2 21:54:30 on ttyu0
--- JUNOS 23.1R1.8 Kernel 64-bit JNPR-12.1-20230307.3e7c4b6_buil
root@:~ I can then check the OVS-bridge and see the interfaces have attached:
root@intelnuc:/usr/local/kvm/vjunos-switch# ovs-vsctl show
7bfddb50-5269-4ad0-9b46-48f0c289b48b
    Bridge veos-b-et2
        Port veos-b-et2
            Interface veos-b-et2
                type: internal
        Port veos-eth2
            Interface veos-eth2
    Bridge vjunos-veos
        Port vjunos-veos
            Interface vjunos-veos
                type: internal
        Port veos-eth1
            Interface veos-eth1
        Port vjunos-ge0
            Interface vjunos-ge0
    Bridge vjunos-b-ge1
        Port vjunos-b-ge1
            Interface vjunos-b-ge1
                type: internal
        Port vjunos-ge1
            Interface vjunos-ge1
    ovs_version: "2.17.3"
The meaningful names really pay off when the lab goes quite large and any troubleshooting gets involved. Easy to see that the interfaces ‘vjunos-ge0’ and ‘veos-eth1’ are connected in a common bridge so I should be able to ping between the two now and run lldp/lacp:
root> show lacp statistics interfaces
Aggregated interface: ae0
    LACP Statistics:       LACP Rx     LACP Tx   Unknown Rx   Illegal Rx
      ge-0/0/0                 560          24            0            0

root> show lldp neighbors
Local Interface    Parent Interface    Chassis Id          Port info          System Name
ge-0/0/0           ae0                 00:03:ad:1b:01:6e   Ethernet1          veos-lab

root> ping 10.0.0.1
PING 10.0.0.1 (10.0.0.1): 56 data bytes
64 bytes from 10.0.0.1: icmp_seq=0 ttl=64 time=2.700 ms
64 bytes from 10.0.0.1: icmp_seq=1 ttl=64 time=2.660 ms
^C
--- 10.0.0.1 ping statistics ---
2 packets transmitted, 2 packets received, 0% packet loss
round-trip min/avg/max/stddev = 2.660/2.680/2.700/0.020 ms

root>
root>
Step 6) Attach some containers and test the dataplane
Using containers are my test endpoints allow me for highly flexible and extremely light weight end points. Another good test endpoint could be cEOS itself but I prefer Ubuntu (or any flavor of *nix) for that extra flexibility and package manager to do anything I could ever want as a network test point. I’ll leave the example DockerFile I used for this in my git-hub but once obtained these commands can be run to stand up the container, connect it to the OVS-bridge, and configure an IP and static route on each
docker run -d --name ubuntu-container-01 -h ubuntu-container-01 --cap-add=NET_ADMIN -i -t ubuntu-docker /bin/bash

ovs-docker add-port veos-b-et2 eth1 ubuntu-container-01
docker exec -it ubuntu-container-01 ip address add 192.168.1.2/24 dev eth1
docker exec -it ubuntu-container-01 route add -net 192.168.2.0/24 gw 192.168.1.1

docker run -d --name ubuntu-container-02 -h ubuntu-container-02 --cap-add=NET_ADMIN -i -t ubuntu-docker /bin/bash

ovs-docker add-port vjunos-b-ge1 eth1 ubuntu-container-02

docker exec -it ubuntu-container-02 ip address add 192.168.2.2/24 dev eth1
docker exec -it ubuntu-container-02 route add -net 192.168.1.0/24 gw 192.168.2.1
Prior to this I configured MPLS on both vEOS and vJunOS (check github for configs) but I can now connect to the docker instance and see the dataplane working from A to Z:
ubuntu-container01 <-> OVSBridge <-> vEOS (OSPF/LDP) <-> OVSbridge <-> (OSPF/LDP) vJunOS Switch <-> OVSBridge <-> ubuntu-container02
root@intelnuc:~# docker ps -a
doCONTAINER ID   IMAGE           COMMAND       CREATED        STATUS        PORTS     NAMES
ef285b7ee938   ubuntu-docker   "/bin/bash"   45 hours ago   Up 45 hours             ubuntu-container-02
5b40e76b5233   ubuntu-docker   "/bin/bash"   45 hours ago   Up 45 hours             ubuntu-container-01
root@intelnuc:~# docker attach  ubuntu-container-01
root@ubuntu-container-01:/# ping 192.168.2.2
PING 192.168.2.2 (192.168.2.2) 56(84) bytes of data.
64 bytes from 192.168.2.2: icmp_seq=1 ttl=62 time=18.5 ms
64 bytes from 192.168.2.2: icmp_seq=2 ttl=62 time=4.64 ms
^C
--- 192.168.2.2 ping statistics ---
2 packets transmitted, 2 received, 0% packet loss, time 1001ms
rtt min/avg/max/mdev = 4.637/11.560/18.484/6.923 ms
root@ubuntu-container-01:/#
A quick verification of the control and data plane on the juniper side:
root> show route table L3VRF.inet.0

L3VRF.inet.0: 5 destinations, 5 routes (5 active, 0 holddown, 0 hidden)
+ = Active Route, - = Last Active, * = Both

192.168.0.1/32     *[BGP/170] 00:16:02, localpref 100, from 172.16.0.1
                      AS path: I, validation-state: unverified
                    >  to 10.0.0.1 via ae0.0, Push 116384
192.168.0.2/32     *[Direct/0] 00:17:36
                    >  via lo0.1
192.168.1.0/24     *[BGP/170] 00:16:02, localpref 100, from 172.16.0.1
                      AS path: I, validation-state: unverified
                    >  to 10.0.0.1 via ae0.0, Push 116384
192.168.2.0/24     *[Direct/0] 00:16:59
                    >  via ge-0/0/1.0
192.168.2.1/32     *[Local/0] 00:16:59
                       Local via ge-0/0/1.0

root> show route forwarding-table destination 192.168.1.0/24 table L3VRF
Routing table: L3VRF.inet
Internet:
Destination        Type RtRef Next hop           Type Index    NhRef Netif
192.168.1.0/24     user     0                    indr  1048574     3
                              10.0.0.1          Push 116384      618     2 ae0.0

root>
And just to prove that the traffic is MPLS encapsulated I can tcpdump on the host machine to see the packets on tuntap interface created that connects the two routers together:
root@intelnuc:~# tcpdump -i vjunos-ge0 -an
tcpdump: verbose output suppressed, use -v[v]... for full protocol decode
listening on vjunos-ge0, link-type EN10MB (Ethernet), snapshot length 262144 bytes
18:07:14.681502 IP 10.0.0.0.646 > 224.0.0.2.646: LDP, Label-Space-ID: 172.16.0.2:0, pdu-length: 38
18:07:14.838075 LACPv1, length 110
18:07:15.084439 MPLS (label 16, exp 0, [S], ttl 63) IP 192.168.1.2 > 192.168.2.2: ICMP echo request, id 4, seq 102, length 64
18:07:15.085077 MPLS (label 116384, exp 0, [S], ttl 63) IP 192.168.2.2 > 192.168.1.2: ICMP echo reply, id 4, seq 102, length 64
18:07:15.090997 IP 172.16.0.1.646 > 172.16.0.2.49657: Flags [P.], seq 1225303067:1225303085, ack 719559917, win 509, options [nop,nop,TS val 1941086198 ecr 2148325320], length 18
18:07:15.207651 IP 172.16.0.2.49657 > 172.16.0.1.646: Flags [.], ack 18, win 16384, options [nop,nop,TS val 2148326434 ecr 1941086198], length 0
18:07:15.456546 IP 10.0.0.0 > 224.0.0.5: OSPFv2, Hello, length 60
^C
7 packets captured
I can see from the arista interface the MPLS packet at the end:
root@intelnuc:~# tcpdump -i veos-eth1 -an
tcpdump: verbose output suppressed, use -v[v]... for full protocol decode
listening on veos-eth1, link-type EN10MB (Ethernet), snapshot length 262144 bytes
18:07:43.297981 IP 10.0.0.0 > 224.0.0.5: OSPFv2, Hello, length 60
18:07:43.672481 IP 10.0.0.1.646 > 224.0.0.2.646: LDP, Label-Space-ID: 172.16.0.1:0, pdu-length: 38
18:07:43.839213 LACPv1, length 110
18:07:43.917667 IP 10.0.0.0.646 > 224.0.0.2.646: LDP, Label-Space-ID: 172.16.0.2:0, pdu-length: 38
18:07:44.079822 IP 172.16.0.2.49657 > 172.16.0.1.646: Flags [P.], seq 719559953:719559971, ack 1225303121, win 16384, options [nop,nop,TS val 2148355322 ecr 1941106198], length 18
18:07:44.082084 IP 172.16.0.1.646 > 172.16.0.2.49657: Flags [.], ack 18, win 509, options [nop,nop,TS val 1941115188 ecr 2148355322], length 0
18:07:44.122193 MPLS (label 16, exp 0, [S], ttl 63) IP 192.168.1.2 > 192.168.2.2: ICMP echo request, id 4, seq 131, length 64
18:07:44.122697 MPLS (label 116384, exp 0, [S], ttl 63) IP 192.168.2.2 > 192.168.1.2: ICMP echo reply, id 4, seq 131, length 64
^C
8 packets captured
8 packets received by filter
0 packets dropped by kernel
root@intelnuc:~#
In conclusion I think this is a great first step from Juniper for a free lab offering for the network community. I have my complaints that I listed at the start of the article but I could easily take the opposite opinion and think “well with vFPC being the dataplane I at least know it’s production grade quality”. The same can’t be said of the competition.
The next blog article will go into automating all of the above steps.